 Perspective

Affiliation:
Department of Oral Medicine, School of Dentistry, Universidad Nacional de Córdoba, Córdoba CP 5000, Argentina
Email: eduardo.piemonte@unc.edu.ar
ORCID: https://orcid.org/0000-0001-5955-1139
Affiliation:
Department of Oral Medicine, School of Dentistry, Universidad Nacional de Córdoba, Córdoba CP 5000, Argentina
ORCID: https://orcid.org/0000-0002-5201-1444
Affiliation:
Department of Oral Medicine, School of Dentistry, Universidad Nacional de Córdoba, Córdoba CP 5000, Argentina
ORCID: https://orcid.org/0009-0007-5768-9557
Affiliation:
Department of Oral Medicine, School of Dentistry, Universidad Nacional de Córdoba, Córdoba CP 5000, Argentina
ORCID: https://orcid.org/0000-0002-0881-9614
Explor Digit Health Technol. 2024;2:249–258 DOI: https://doi.org/10.37349/edht.2024.00025
Received: April 25, 2024 Accepted: August 14, 2024 Published: September 13, 2024
Academic Editor: Shariful Islam, Deakin University, Australia
The article belongs to the special issue Digital Health Technologies for the Early Detection of Oral Cancer
Photographic images are an essential tool in oral medicine practice, even though their value is conditioned by their quality. Digital photography using smartphones (SPhs) has had many advances, nowadays allowing the acquisition of high-quality pictures. Compared to professional cameras, it has advantages and disadvantages. The latter comprise photographs out of focus, poorly framed, and lighting problems due to shadows, artifacts, and color alterations, among other problems mainly mediated by the operator. Such defects can limit the proper interpretation of the image representing the patient’s condition. This perspective aims to describe the basic concepts of photography and the functional features of SPhs. This will allow programming those devices properly for oral telemedicine (OTM), understanding their limitations, and correcting errors for the photographs to be used effectively. We also include empirical solutions and illustrations showing that photography with SPhs could be easily executable by any health professional and even by the patients themselves.
Oral telemedicine (OTM) has proven to be useful for diagnosing oral pathologies, especially when the patient is unable to access oral medicine services [1–4]. In this framework, digital images provide a useful tool so that dental health professionals can be guided by professionals from a specialized reference center, with the aim of guiding the diagnosis, treatment, and follow-up of a patient, or justifying a prompt and proper referral. Strictly regarding photography, using professional cameras [usually known as digital single-lens reflex cameras (DSLR)] is undoubtedly the best tool to obtain images in all situations, including oral medicine. However, the use of cameras integrated into smartphones (SPhs) has proven to be valuable, mainly because it has certain advantages over professional cameras [5]. Advantages of SPh photography include a more intuitive use, no need for long and costly training, the ability of single-hand operation, immediate viewing of the images on a larger screen, and the possibility of easily editing and sharing images using the same equipment [6–8]. Therefore, the use of SPhs to take images for OTM has become mainstream.
Images obtained for OTM should be obtained for its purpose since they do not pursue aesthetics—such as the ones used for portraits or landscapes, but seek to show the state of oral mucosa objectively. Therefore, it must have the following features: proper framing, focus with the greatest depth of field possible, balanced lighting, natural color reproduction, cropping of areas of interest (AOIs), and high optical and digital resolution for its capture and eventual transfer.
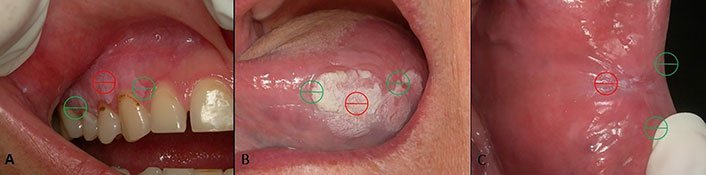
In OTM, it is common to receive images being blurred or out of focus in AOIs, excessively bright (so-called “burned” by the flash), or without selective cropping of the AOI, among other defects (see Figure 1). Such photos should be discarded because they do not provide a clear depiction of the patient’s condition. Moreover, they could be misleading, altering both the interpretation of clinical signs and the diagnostic procedure. Hence, the aim of this manuscript is to provide procedures or strategies that can be used to improve SPhs photography to be used for OTM.
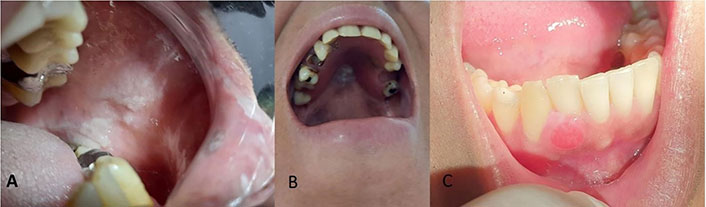
Images unsuitable for oral telemedicine. A) Poorly lightened and out of focus in the area of interest (AOI); B) insufficient light, out-of-focus photo without cropping of the AOI; C) well-framed and focused image, but “burnt” by the flash, which diminishes image sharpness
Since the availability of cell phones with video graphics array (VGA) resolution without a flash, the capabilities of SPhs have improved enormously. Nowadays, almost all SPhs have enough features to allow taking acceptable pictures of the oral cavity. Nonetheless, the immense variety of makes, models, cameras, lenses, sensors, software, and photographic applications (PhAps) means that the strategies developed in this article may not be predictably applied to all SPhs. So, the minimal requisites of a given SPh should be:
Main (rear) camera of 10 megapixels (MP) or higher (in current SPhs it is usually much more).
Embedded flash, preferably close to the lens.
Native or acquired PhAp that allows adjusting resolution, flash, white balance, ISO sensitivity (set by the International Organization for Standardization that represents sensitivity to light as a numerical value), exposure value, touch focus, viewfinder grid, image compression formats [JPEG (joint photographic experts group image format) or similar], etc.
Proper application of the protocol for taking pictures using SPhs allows us to know when we should correct different parameters to obtain the best images. We propose the SPhs steps sequence for photography in OTM:
To know the photographic functions of both your SPh and its PhAp.
Programming the SPh considering the type of image to be taken.
Clean and dry the SPh lens.
Clean and dry the area to be photographed.
Proper framing of the AOI, using mirrors, retractors, and/or contrasters (if needed).
Proper focus of the AOI.
Take the picture.
Check the quality of the image.
Edit, save, transfer, and/or share images.
Due to the great variety of both SPhs and PhAp, we suggest a basic setting on auto mode, with forced flash and a visible 3 × 3 grid, using the higher allowed resolution in JPG format (or similar). If the resulting image is not proper, the ISO sensitivity, exposure value, and white balance are the main parameters to modify (Table 1). Those will depend on the defects found in the image, which will be detailed in the following section.
Smartphones’ basic programming for taking pictures in oral telemedicine
| Criteria | Programming |
|---|---|
| Resolution | Maximum possible (10 or more megapixels) |
| Format | JPG |
| Flash | On (forced) |
| Grid | 3 × 3 |
| White balance | Flashlight or a 5,500 degrees Kelvin (K) source |
| ISO | Equal or less than 100 |
| Touch focus | On |
For all types of oral photography—not only for OTM, it is also advisable to wash and dry the AOI to remove debris or saliva that could alter the brightness and color of the mucosa.
In dental photography, the area of the patient to be photographed is called framing. In orthodontics of aesthetics, the framing should be done systematically since different shots of the dental arch must be reproduced in several steps for comparison purposes. In oral medicine, the lesions may display an irregular pattern, not always allowing the framing according to the natural views of the patient. Accordingly, there is more flexibility in selecting the framing, but even so, it is advisable to follow some general guidelines [9].
Framing for OTM is subjective to some SPhs limitations. Since the photos should be taken at a short focus distance (distance between the subject/object to be photographed and the camera lens), several problems may arise. The more common is the “burn” effect, a limited field depth, and perspective distortion (similar to when seeing an image reflected on a sphere with rounded margins). To resolve them, we should increase the focus distance (move away from the subject) [10]. This implies that within the image some non-desired peripheral areas will be included, which should be cropped after taking the picture.
A simple strategy to properly set the focus distance for taking pictures of the oral mucosa is to use a 3 × 3 grid, a feature easily enabled in practically all SPhs. Once that is activated, 9 sectors are defined, one central and 8 peripherals. We should move away from the patient without using the optical or digital zoom until the AOI is roughly within the central quadrant, which would prevent distortion due to the improved focus distance. In turn, the grid lines would function as a reference point to place the picture framing in relation to the natural planes of the person (horizontal/vertical). See Figure 2.
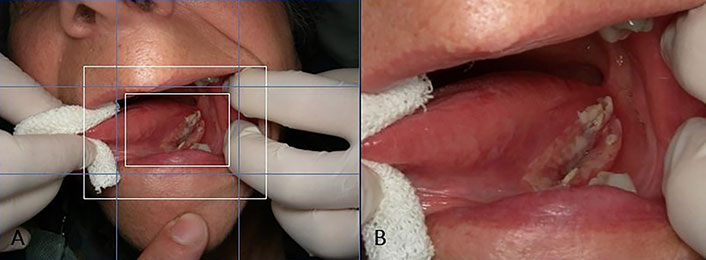
Picture framing. A) The 3 × 3 grid is enabled (in light blue), allowing to adjust the framing according to the natural planes of the patient. The white rectangles signify the area of interest, being roughly within the central quadrant; B) the cropping could be done later, and sometimes even with the digital or optical zoom of the smartphone
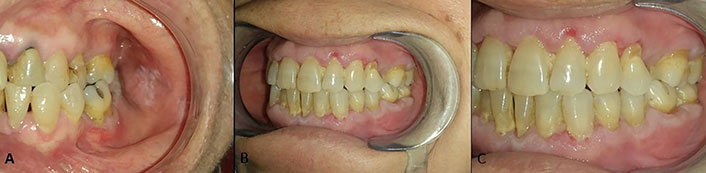
The use of retractors is strongly advised, particularly when photographing posterior areas of buccal mucosa, tongue borders, gingiva, or the dental arch (Figure 3). Mirrors are especially useful for capturing occlusal planes, including lesions on the hard palate or in areas that are difficult to view directly, such as the inner side of the lower gingiva (Figure 4).
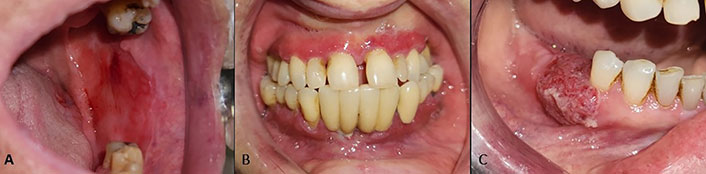
Results with the use of retractors. Cheek retractors facilitate clear visualization of A) buccal mucosa, B) dental arch, and C) tongue borders
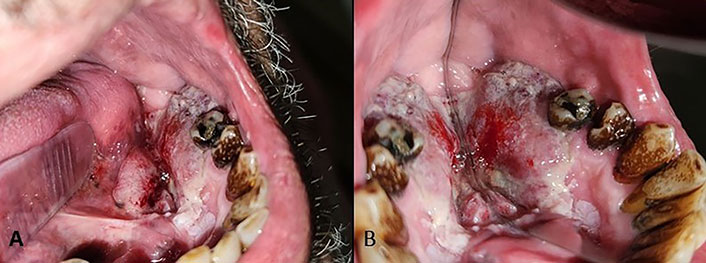
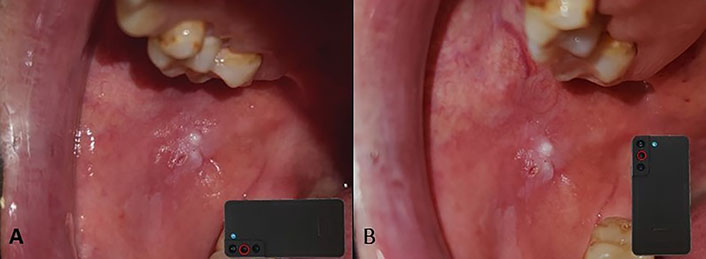
Mirror use. A) Oral squamous cell carcinoma on the floor of the mouth and lower gingiva, which is difficult to view directly; B) the use of mirrors allows a better view
Lighting orientation could generate shadow areas, affecting AOI. Professional (DSLR) cameras for oral photography have ring or multipoint flashes for this reason. Some auxiliary devices for SPh could generate a similar effect, but usually they are expensive. Such devices almost completely prevent shadow cones, thus ensuring that the entire AOI is suitably illuminated. In contrast, unidirectional lightning produces shadows, allowing a three-dimensional view of the oral lesions (Figure 5) [11]. SPhs are favored by this effect because often the cone shadows produced are small, a consequence of the reduced distance between the lens and the flash. In the event of a shadow affecting a relevant part of the AOI, it is advisable to rotate the SPh until the position of the flash does not generate unwanted shadows (Figure 6).
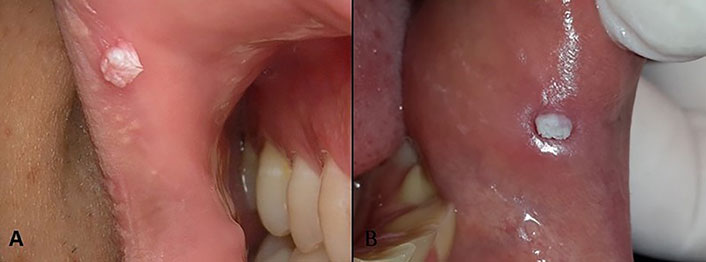
Illumination of the area of interest. A) Image taken with a flash diffuser, the wart is shadowless, and the three-dimensional view of the lesion is lost; B) picture taken using the smartphone flash, allowing some shadows that ensure a correct perception of the three-dimensional view. In both cases, the diagnosis was oral squamous papilloma/oral wart because of human papillomavirus
Changes in the smartphone orientation modify the relative position of the flash (light blue circle) to the main sensor (red circle). Rotating the smartphone from A) to B) during framing ensures that cone shadows are outside the area of interest
It is not uncommon for pictures taken with the SPhs flash to produce a “burnt” effect, which is with too much brightness, that cannot be improved by editing. It is of no use to replace the light source with a weaker one because that can alter the white balance. Therefore, to avoid burnt photos, there are four recommended techniques, which could be applied individually or in combination. We can gradually increase focus distance (move the camera away from the mouth) and/or reduce the ISO sensitivity to 100 or less (lower sensitivity equals less light captured by the sensors, thus reducing overall brightness). If those steps are not sufficient to avoid burning photographs, we can use a white sheet of paper over the flash to soften its intensity, a less orthodox method (Figure 7).
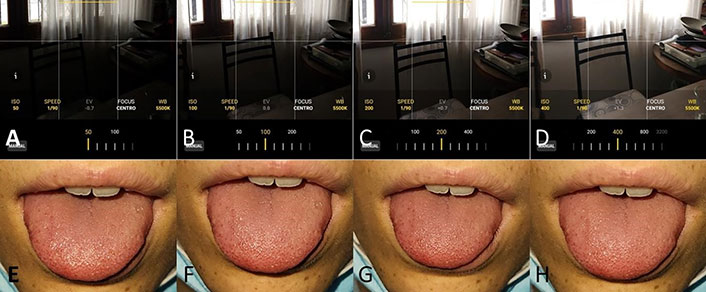
ISO programming to avoid burned photos. A), B), C), and D) show a non-dental example of the effect of ISO regulation at values 50, 100, 200, and 400, respectively, and without automatic adjustment of other parameters. The higher the ISO, the higher the sensitivity, and the greater the possibility of photos being burned. E), F), G), and H) are clinical photos taken at ISO 50, 100, 200, and 400, respectively, with automatic adjustment of other parameters, which compensate for the ISO variation
Different light sources, of various color temperatures, can produce unnatural results concerning the colors seen in the oral mucosa: cool or blue, in the other extreme warm or more yellow/orange. Color temperature compensation can be adjusted using the white balance function in PhAp, where we set the color temperature of the light to be used to take the picture, and the software adds the lacking tones. Thus, when the light source is blue, the opposite warm colors are added, and the inverse is when there is an orange flash. Nowadays, pretty much all the PhAps have this function, whether in the manual or the professional mode. For example, if an incandescent (warm) light source is going to be used, which has a color temperature of around 3,000 K, the images will likely be very yellow. Hence, using the white balance function, the temperature could be adjusted by selecting the default incandescent (warm) option, or better yet, selecting 3,000 K. With that setting, the PhAp will add blue tones to compensate for the colors of the image (Figure 8). Every time the light source is changed, the white balance should be adjusted accordingly. To avoid this tiresome process, it is advisable to always use the flashlight of the SPh. This is a light source with a stable color temperature (usually around 5,500 K), which is like natural daylight and therefore offers a better reproduction of colors [8, 11]. Also, other bright light sources should be turned off, such as the light of the dental chair.
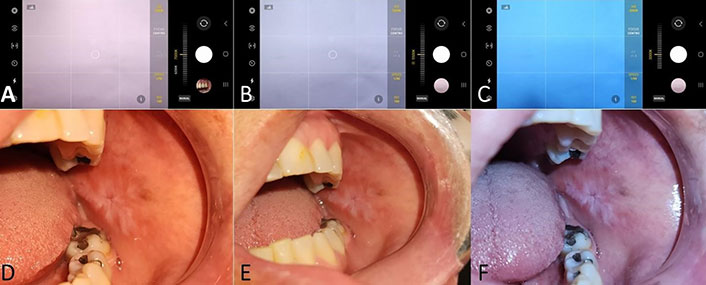
White balance. A), B), and C) Screen captions showing the white balance settings. A) was set for 7,000 degrees Kelvin (K) (cold light), so warm, reddish, and yellow shades are added by the photographic application; B) was programmed for a 5,500 K (neutral light), so the software does not alter the white balance; C) was set at 3,000 K (warm light), so blue shades were added. D), E), and F) are clinical photos taken at 7,000 K, 5,500 K, and 3,000 K, respectively. Notice that when the white balance is set at 3,000 K, highlighting cool (blue) colors, the limits of a white lesion can be appreciated more accurately
Bearing in mind that image framing will be done moving away from the site to be photographed (as explained before), it is likely that the final picture will include areas of skin. In such conditions, if we shoot without adjusting the focus, automatically the areas with better light (the skin, closer to the flash) would be in focus, generally rendering the oral mucosa blurred and out of focus. This could be easily corrected by selecting the proper AOI by touching the focus area in the SPh screen. Often, a contemporary SPh will allow one to select a specific area to be on focus by touching and holding any given part of the screen until a mark appears (a circle, a square of square brackets). Such a mark may appear first in white, meaning that it is selected but not fixed, and when shooting, it changes automatically. By pressing and holding for a couple of more seconds, the mark will change its color, meaning the area is both selected and fixed; consequently, when shooting the picture, the focus and light measurements will be applied to the chosen sector. The process of focus for SPhs is based on the detection of linear patterns and contrasting areas, unlike the ones of professional cameras that use systems of optical lenses. Subsequently, it is suggested to make the selection of the area to be on focus by manually selecting it over a natural line or over parts where there is a clear contrast of colors. Areas without lines or poorly defined edges will make it difficult to obtain a proper focus (Figure 9).
Tactile selection of the area of focus allows informing the software which specific sector needs to be in focus, where A) is a gingival area with clear contrast with the teeth, B) is a white lesion with evident contrast with the surrounding mucosa on the edge of the tongue, and C) is a reddish lesion on the buccal mucosa without defined limits with the tissues around it. Ideally, this should be done in areas where contrasting lines (in green) are readily visible. Parts with homogeneous color (marked in red) hinder the proper automatic focus of the photographic application
Another problem of focus is what is called depth of field, which is the distance between the closest sharp part in focus and the furthest sharp part in focus within the frame of an image. When photographing large lesions, especially on the buccal mucosa, palate, and tongue, a small depth of field will produce a blurred image. Depth of field relies on three factors: diaphragm aperture, focal length, and focus distance (Figure 10). The diaphragm aperture is the opening that regulates the amount of light that reaches the camera sensor through the lens. A larger aperture allows more light in but also reduces the depth of field. Since SPh has small sensors, they commonly need a larger diaphragm aperture for letting in more light, as well as a smaller depth of field. Such an effect is produced mainly at short focus distances. On the contrary, at longer distances the diaphragm aperture is relatively small, so SPh tends to produce photographs with a large depth of field, which is undoubtedly useful for OTM photographs. Nonetheless, most SPhs do not allow adjusting the aperture, so this cannot be used to modify the depth of field. The focal length is the distance between the lens’s optical center and the sensor on which the image is projected. The longer the focal length (using a larger photo lens), the smaller the depth of field becomes. Once again, since in SPhs, the focus distance is fixed, we cannot use it to modify in any way the depth of field. The third factor is focusing distance: a longer one will produce a greater depth of field. As a result, when we move away from the patient to get a proper framing, we are also enlarging the depth of field. That is why it is advisable to take pictures using the highest resolution available, avoiding getting too close to the AOI. By doing this, at the same time, we avoid a burnt image, avoid perspective distortion, and expand the depth of field, and the photograph thus captured can then be cropped to display only the AOI.
Management of depth of field. A) Image taken at a short focus distance (20 cm approximately), resulting in a shallow depth of field; B) using a greater focus distance (+/– 40 cm) produces a greater depth of field. To improve this outcome even more, we can also use the rule of thirds; C) capturing the image at the highest resolution offers clear images despite the cropping done afterwards
SPhs offer multiple ways to take an image, depending on the PhAp functions. Among them, the one that is more comfortable and safer for the operator should be used ideally. Taking a picture could be done using the main shutter button on the SPh screen, or an auxiliary within the photograph area, by pressing one of the physical buttons (ordinarily a programmable function) or even saying a pre-programmed word. The shoot should always be done after having selected the AOI on the screen, trying to make the few movements possible so as not to alter the established focus.
Once the pictures have been taken, it is advisable to check each one of them, using the zoom until only the AOI is left, verifying that it is free of blurred or pixelated areas with a proper resolution. If the image is inappropriate, consider potential causes and change the required parameters for a new one.
Since the original, untouched intraoral picture likely has unwanted areas, those should be edited out before sharing, which also reduces file size. First, we should use the PhAp image editor to rotate the image (90, 180, 270 degrees) to roughly accommodate it concerning the patient’s natural planes. Then we should straighten more, rotating the image more finely, degree by degree, if necessary, while the software trims the excess. Once the image has been appropriately straightened, the unwanted areas could be cropped, being able to select here different crop ratios as needed (e.g., 1:1, 4:3, 16:9), both horizontally and vertically (Figure 11). If a mirror was used when the image was taken, the image should be flipped using the mirror function.
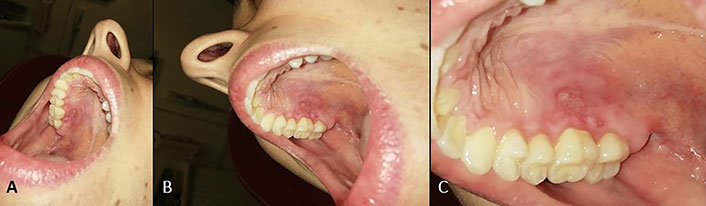
Image editing. A) Original image, with a vertical major axis; B) rotated and straightened image; C) cropped image showing only the area of interest
When pictures are uploaded to social networks or in most instant messaging apps, they are usually compressed automatically, losing resolution, and may become pixelated even with a slight zoom. Nevertheless, if the original image had a resolution over 10 MP, being cropped to leave only the AOI, the quality may be enough for proper viewing on an SPh screen or even a notebook [12, 13]. On the other hand, if we want the original resolution to be kept, other sharing methods should be used, the simpler being sending the images by e-mail, which warrants unaltered transfer. If the images are going to be shared using instant messaging apps, they should be sent as documents (not as images), which have more steps but ensure the preservation of the original resolution.
The capture of photographs with the methodology suggested in this manuscript is not a diagnostic procedure, nor does it replace the clinical or complementary procedures necessary to obtain a correct, certain diagnosis in each patient. Photography for OTM can be obtained with proper quality using the basic notions of photography, with simple programming and execution, considering specific methods to correct errors or limitations typical of SPhs cameras. Such procedures could also be used by dental assistants, other health professionals, and even patients. These photographic concepts could be applied in other areas of health in which they can be accessed with direct vision, such as dermatology, otorhinolaryngology, and gynecology, although they require their application by suitable professionals. The correct use of OTM could be favored by the development of PhAps for SPhs that are adjusted to the photographic parameters described in this manuscript or that allow a more intuitive adjustment of them.
AOIs: areas of interest
ISO: set by the International Organization for Standardization that represents sensitivity to light as a numerical value
JPEG/JPG: joint photographic experts group image format
OTM: oral telemedicine
PhAps: photographic applications
SPhs: smartphones
EDP: Conceptualization, Methodology, Visualization, Writing—original draft, Writing—review & editing. GMG, MFGC, and JPL: Writing—original draft, Writing—review & editing. All authors read and approved the submitted version.
The authors declare that they have no conflicts of interest.
The manuscript is illustrated with clinical photos, not to develop a clinical case, but only to show the different results that are obtained by modifying the photographic parameters, which do not constitute a medical treatment nor a diagnostic procedure. In this case, ethical approval is not applicable according to local regulations (SALUD PUBLICA. Decreto 1089/2012).
Informed consent to participate in the study was obtained from all participants.
Informed consent to publication was obtained from relevant participants.
Not applicable.
Not applicable.
© The Author(s) 2024.
Copyright: © The Author(s) 2024. This is an Open Access article licensed under a Creative Commons Attribution 4.0 International License (https://creativecommons.org/licenses/by/4.0/), which permits unrestricted use, sharing, adaptation, distribution and reproduction in any medium or format, for any purpose, even commercially, as long as you give appropriate credit to the original author(s) and the source, provide a link to the Creative Commons license, and indicate if changes were made.

Xin-Jia Cai
Kehinde Kazeem Kanmodi ... Jacob Njideka Nwafor
Romina Andrian ... Gerardo Gilligan
Caique Mariano Pedroso ... Alan Roger Santos-Silva
Márcio Diniz-Freitas ... Pedro Diz-Dios
Gerardo Gilligan ... Eduardo Piemonte
Simon A. Fox, Camile S. Farah
Constanza B. Morales-Gómez ... Víctor Beltrán
Anna Luíza Damaceno Araújo ... Alan Roger Santos-Silva
